This is where we should have started Diamond Hill over looking the Denver Sky line

Out chasing storms again with the Girls

Denver Photographer Corbin Elliott
This is where we should have started Diamond Hill over looking the Denver Sky line
Out chasing storms again with the Girls
Story Book Photo Shoot with Alisha Marie as Wendy from Peter Pan.

Corbin Elliott Photography, portrait photographer Denver
Was out racing around East Denver and Downtown to get the right view .. and should have just gone up to Diamond Hill in the first place.

Out chasing storms again with the Girls
Buy This Photo http://corbinsphoto.smugmug.com/buy/30522153_hp3HKH/3370689896_QRZNQfc/
Fireworks camera settings and how to shoot in Part 1 Lighting and FireWorks Camera Settings we covered the equipment that would be required so on to the shooting.

Fireworks shooting and Camera Settings
Denver Photography
This shot was actually taken with a Canon Rebel and the Kit lens 18-55mm. So you really don’t need the “pro-sumer” style cameras to get some really spectacular shots. Remember Focus once and turn off auto focus, check your images every once in a while to make sure you still have good focus. 🙂
Camera settings.
Manual mode
Drive Mode: One Shot (Click when you hear the shell coming out of the tube and watch the trail going up.)
AF (Auto focus off) MF (Manual Focus)
ISO : 400
Shutter Speed: 3 sec
Aperture : f/22
Lens 18-55mm set at 18mm
Now you can zoom in and out depending on where you are in reference to the actual bursts to get foreground interest or just the burst of light.

With a change of settings you can get a little creative too and have some blur that does not look like camera shake.
Camera settings.
Manual mode
Drive Mode: One Shot (Click when you hear the shell coming out of the tube and watch the trail going up.)
AF (Auto focus off) MF (Manual Focus)
ISO : 160
Shutter Speed: 1.6 sec
Aperture : f/9
Lens 17-50mm set at 32mm

For a little more foreground interest with the Dick’s Sporting Good Board in the front. Got to watch the tripod while you are shooting even the smallest moment will cause your lines to be jagged.
Camera settings.
Manual mode
Drive Mode: One Shot (Click when you hear the shell coming out of the tube and watch the trail going up.)
AF (Auto focus off) MF (Manual Focus)
ISO : 100
Shutter Speed: 4 sec
Aperture : f/11
Lens 17-50mm set at 17mm
Scott Kelby one of the photographers I aspire to be as good as also created a tutorial as well you may want to look at.
How to Take Awesome Fireworks Photos This Fourth of July
He suggests a longer lens for the bursts.. as well as similar settings, but leaves the ISO out .. I would suggest 100-400 but you will have to play around with the settings to get what you like.
Go have fun and shoot most cities have 2 different shows this year on the 3rd and the 4th so you have more than one chance to get the shot. 🙂

Lightning 21 May 2014
I am by no means an expert at shooting Fireworks, Lightning Storms, or any other long exposure instances. I have read quite a few tutorials and know there are tons of them out there but here is my take on what you need and what you can expect when shooting for that spectacular shot.
Things you will need
1.) A Camera … he he he .. sound obvious right?
Well the camera you should have is a DSLR with the capability of Manual Mode.
I am sure you can accomplish some of these types of shots with your point and shoot or you may get lucky and time things just right with your phone. But really get out the big guns for these shots.
I am now shooting with a Canon 50D. Nothing spectacular it is not top of the line nor is it brand new and you will not need the most expensive of lenses either kit lenses work just as well when stopped down on the aperture.
It is a must that you learn how to use your camera in “Manual”. Why? you ask. Learning how to set up your camera in manual will also give you more flexibility with aperture values, ISO, and shutter speed control. Leading you get get better images.
2.) Tripod sorry but this is a must. For these shots you can get away with your cheapo version from Walmart. There is no real need to go out and spend hundreds of dollars on a professional grade Manfrotto tripod. All you need it to do is hold your camera still while the shutter is open so you can get clean non-jittery images. (he he non-jittery yes that is a technical term..)
3.) Optional but recommended. A Remote Shutter Release. This will allow you to shot with out touching the camera so that you do not introduce any more camera shake while the shutter is open.
4.) Optional but also suggested. A Rain Coat for your camera. Op/Tech rain sleeves are sold in 2 packs and can be ordered online for 10$ usd I have found them at our local Mikes Camera for a bit more 20$ usd, but I will pay that over getting my camera gear wet.
*** Warning going out during sever weather could be hazardous to your health injury or death could occur. I am not responsible if you choose to go out during a Tornado warning or any other sever weather times. Just so you Know 🙂 ***
This post assumes that you already know the basics of Aperture, Shutter speeds, and ISO values. So I will not cover those settings in depth here, but if you want more please comment and I will see about later posts.
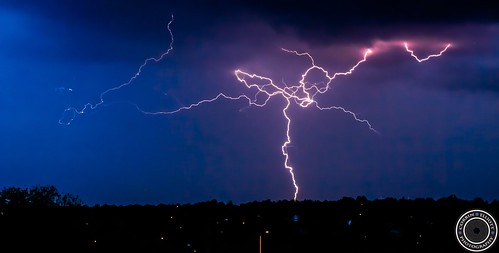
For the shot on top of the post I was looking for more strikes behind the structure. This was taken around 9:45 at night out close to Denver International Airport, until I was told by security this was not an area I was allowed to be in much less shooting.
The settings for the shot were:
Manual mode
Drive Mode: Low Speed Continuous (So I could just hold the shutter button down and take shot after shot)
You will take a bunch of images this way but will limit the missed images of strikes between shots.
AF (Auto focus off) On your lens there is a switch for AF (Auto Focus) and MF (Manual Focus)
Focus once on an area you want to shoot then switch it to MF and leave it. But remember to change back if you
change locations you will need to refocus.
ISO : 400
Shutter Speed: 3.2 sec
Aperture : f/7.1
On this shot I used the 50D with a Tamron 17-50mm F/2.8 at 42mm to get the area I wanted with foreground interest and background lighting. I had the Aperture stopped down so more of the image foreground and background were in focus, and the shutter speed or 3.2 seconds to allow enough light in to properly expose the image. Finished off in LightRoom for editing.

While this was a spectacular strike, I did not get any foreground interest in the shot and have since adjusted how and where I shoot to get more interesting images.
Settings were very close to the first shot.
Manual mode
Drive Mode: Low Speed Continuous
AF (Auto focus off) MF (Manual Focus)
ISO : 200
Shutter Speed: 2.5 sec
Aperture : f/7.1
Lens 17-50mm set at 22mm to get the entire area of where the strikes were. Cropping in post may be necessary.

Manual mode
Drive Mode: Low Speed Continuous
AF (Auto focus off) MF (Manual Focus)
ISO : 200
Shutter Speed: 0.8 sec
Aperture : f/9
Lens 17-50mm set at 22mm
As you can see there is no hard fast rule that I follow for these shots… Play with the aperture and the shutter speeds to your liking and you will find what you are comfortable with remember the more you stop down your aperture the less light gets in so adjust your exposure/ shutter speed and ISO. But keep the ISO low so as not to introduce noise.
Continued in Part 2 Fire Works and Light Paining. will put a link here when I can get it published

From the 50’s Style PhotoShoot in Lakewood Colorado on the 17th of May 2014 with Samantha
Photographer Denver Follow me on Google + at +CorbinElliott
First Lightning Storm of the 2014 Spring season. I am determined to get much better at these.
Follow me on Google + at +CorbinElliott
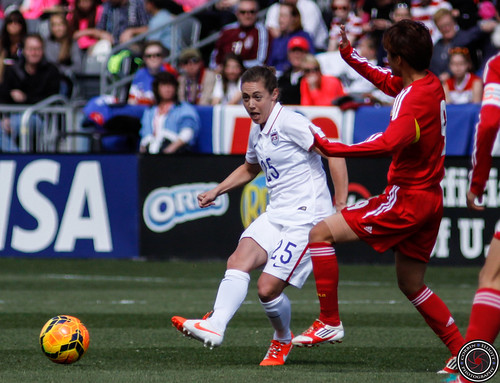
USWNT vs China PR Photo Gallery Photographer Denver Follow me on Google + at +CorbinElliott

Graffiti Run Apr 28th 2014 Denver Colorado Photographer Denver
Graffiti Run Denver 2014
Follow me on Google + at +CorbinElliott